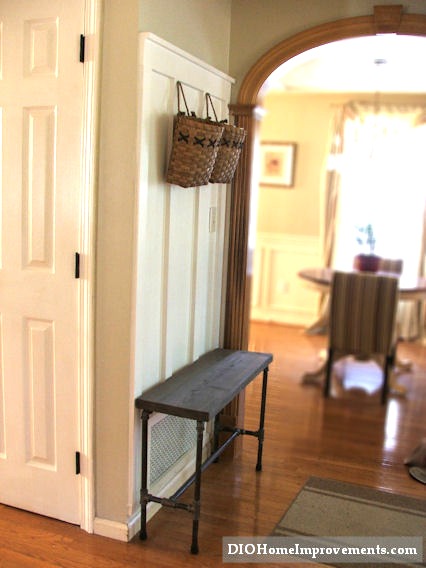
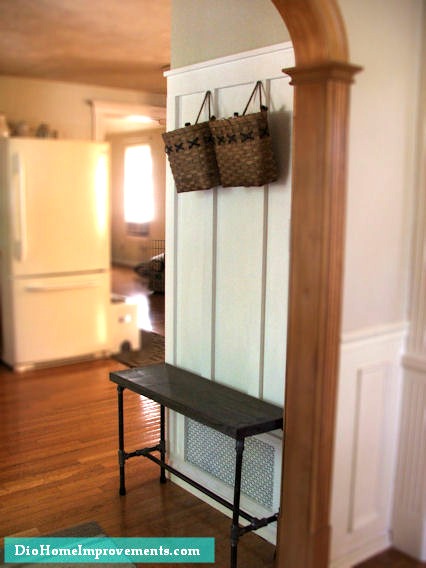
A while ago I saw a plumbers pipe table and fell in love with it. Originally I was going to make a plumbers pipe coffee table but then decided I wanted a bench instead to go with the new board & batten wall I did in my kitchen. I couldn’t find any images or information online to look at a bench like this but I assumed it would be the same as making a coffee table with a few adjustments. So I began building my plumbers pipe bench!
Supplies I used:
1) 2″ x 12″ x 8′ piece of douglas fir, cut roughly 32″ long $20.17
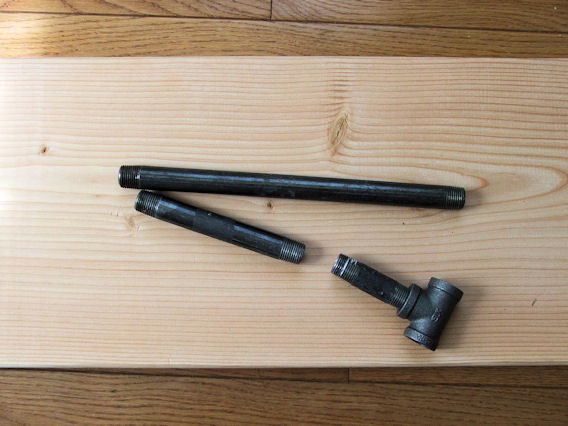
1) 1/2″ x 30″ black iron pipe $7.89 ea
4) 1/2″ x 12″ black iron pipes $4.27 ea
4) 1/2″ x 6″ black iron pipes $2.56 ea
8) 1/2″ x 3″ black iron pipes $1.56 ea
6) 1/2″ black iron T $2.10 ea
4) black rubber caps for the bottom of the feet $2.19 for four
4) 1/2″ black iron elbow* $1.59 ea
4) pipe clips* $2.28 for a bag of ten
* if the wood for the top of my bench had been wider then 12″ I would have used black iron flanges instead of the elbows and clips to attach the wood to the pipe legs.
I had a general idea on how to build this, I knew the pieces I was going to need but I wasn’t sure on the lengths for the pipes I would need for the legs, Dominick at HD helped me out, I told him what my plan was and together we built two legs, factoring the thickness of the wood top, we rebuilt the legs with shorter pipes, I wanted it around 20″ tall, taller then most benches, no particular reason for that height I just wanted it taller then a typical chair or bench. We settled on the pieces of pipe I got to have the bench at about 20″. I had the 2 x 12 cut at HD while I was there, saving myself the time to cut it at home!
My original plan was to use flanges to attach the wood top to the pipe legs however the flanges were going to stick out beyond the sides of the wood top, Ahh so not the look I was going for! I could have used flanges if I wanted the width between legs to be shorter but I was concerned with stability if the legs were too close. So I wracked my brain and decided to use an elbow with a short piece of pipe on the top of the four legs and used pipe clips to attach to the wood top this did add to the height a bit but It’s still comfortable to sit and take your boots off in the winter, the only reason this bench will really get used 🙂 The cool thing about this bench is you can easily turn it into a table by changing out the length of the pipes on the legs!!
Here is a diagram to show where all the pipes were attached to make the base
Here is how the wood top is attached to the base (I haven’t attached the base at this point because I still had to stain the top at that point)
Before securing the base to the wood top I sanded with 320 grit sand paper, stained, sanded again with 220 grit, waxed the top then I attached the base.
This project cost a total of $66.04 Check back to see how I made my own Wood Stain for this project with items you can find in your own home!
This is one of my favorite DIY projects. What is one of your favorite crafts, DIY, home improvement or any other type of project you’ve ever done?
Linking to: That DIY Party I Should Be Mopping The Floors The Dedicated House Give Me The Goods Monday Home (Work) Wednesday Project Inspire(d) Not Just A Housewife It’s Overflowing Tater Tots & Jello Common Ground Funky Junk Interiors Liz Marie Inspire Me My Repurposed Life My Uncommon Slice of Suburbia Be Different Act Normal Six Sisters Stuff Suburbs Mama Nifty Thrifty Things Flamingo Toes Power of Pinterest Designing Dining and Diapers Silver Pennies Truly Lovely Blog Lolly Jane – The Scoop Red OUX Interiors Little Miss Celebration City Farm House
Related Posts:
Board & Batten Tutorial
DIY Air Return Vent
Oxidizing Wood (home made stain for weather wood look)
I love this and just got back from Lowes and finished putting it together. 2 questions:
1) what size clamps did you use to attach it to the top? I bought 1/2″ but they’re too small.
2) Also, how did you get all the grease off the pipes? I have a 13mo old and and don’t want her ingesting that stuff.
Mine didn’t have grease on them, I used 1″ clips.
Hi Dria, hope you’re doing well! I wanted to let you know I featured your bench today on my blog post about DIY industrial pipe furniture, I just love this! Please let me know if you prefer not to be featured and I will take it down. Have a great day! Sharon @ lilikoijoy.com
That is so nice Sharon, thank you so much I’m honored!!
I absolutely love this. It looks so expensive. I think that even I could do this project. I think I may have to give it a try. I am definitely going to pin it for later.
Thank you so much for stopping by Dianna! You should def give this a try it is so easy to build! Let me know when you do it, I’d love to see yours 🙂
I love the end result but I confess seeing the before pictures scared me. I am not such a DIY person but I really really love your creativity with pipes. Great job!
Thank you so much! This project was really easy you could definitely do this!
Ok, this is absolutely amazing! This one is going to have to be on my “to do” list, what a great idea! I was mostly concerned with how you attached the pipes to the wood top, thinking that the pipes would have to be drilled… but you have such an easy and affordable solution to that. Thanks so much for sharing! I’m so happy to be visiting, and congrats on your SITS Day!
Thank you so much Andrea! I think you will be really amazed at how easy it is to make one of these, let me know when you have yours done I’d love to see it!
This is an awesome project! I never would have thought to make something with plumber’s pipe! Very cool!!
Thank you so much! I really love using plumbers pipe in decor!
This is awesome! I will have to try this once it warms up again.
Thank you so much for stopping by, I would love to see your bench when you get to making it!
This is so cool! Pinned this to my DIY board. Happy SITS Day!
Thank you so much Jennifer!!
Awesome! Do you know if there is a weight limit for this? Happy SITS Day!
Hi Steph, I’m not sure what the weight limit would be, thanks for stopping by!
That looks great! And it fits really well in your house.
Over from SITS
Thanks so much!!
This looks great in your kitchen!! You make it look so easy – love the step by step directions. Great job! Visiting from SITS today.
Thank you so much Allie! It was a lot of fun making this bench, it really was super easy to do!
A very nice addition to your kitchen. The proudest DIY project is my faux birdhouse fence I made. It is both a fence and a site that makes me smile. Enjoy your SITS Day.
Thank you Sheila! Your fence sounds amazing 🙂
I am really impressed with your ingenuity! That bench looks incredible, and not something I would have ever though to make. I once fixed up an old wooden sideboard I got for free, of which I am quite proud, but I think that’s about my limit. Nicely done, and happy SITS day!
Thank you so much Bev! That project is one of my favorite ones I’ve done so far. Thank you so much for stopping by!
Beautiful! That looks so easy, I might have my kids try it out! Really came out nicely, and I love that you have your dog in the background in one of the photos (by the way, great photos too!). Visiting from SITS…love the site!
Thank you so much Nicole, the bench really was so easy to make!
A very clever idea! I’ve been on the hunt for a bar cart. Your bench design and instructions have sparked some ideas on how to make one instead. Thank you!
Thank you so much Sara, I’d love to see your bar cart when you have it done!!
Hi! I am in love with this project. We are actually looking to build a desk with this concept for our spare bedroom. We live in an apartment with a very industrial feel, so this would work out great! I’m in the midst of determining sizes, etc so we can get it rolling. I just called our local Home Depot & they have black steel in stock, but not black iron. Do you think that would work the same? Any chance you would have used steel instead of iron? Good news is that Home Depot cuts & threads the pipe for free to any size you want!
Thanks for your help!
Blake
Hi Blake, I think the steel will work just as well! When you say steel are speaking of galvanized pipe or are you thinking of using the Stainless Steel Tube? The galvanized pipe looks the same as the iron pipes. The stainless steel looks more like conduit. If you are thinking of using the stainless steel pipe it may not have the weight the iron or the galvanized pipe has to keep the desk from moving easily. I’d love to see your desk when you are done!
Hi there – did you get the douglas fir board from the hardware store (HD?) or somewhere else?
Hi, I got it at Home Depot!
Is it functional? How much weight do you think it can withstand as a seat?
Hi Karen, yes the bench is functional, I don’t know how many pounds it can withstand the legs are Iron so I would assume it can withstand a lot.
I like the project only thing I might change for more strength is to add two solid pieces of pipe lengthwise on the top rather than the 3 inch pieces.This would tie the two ends together on the top. Going this far, a few more $$ for the extra length of pipe would seal the deal on the indestructibility of this bench. You could still secure the wood to the bench in the same manner.
Nice project!
Chris
Thanks Chris, will keep that in mind!!
Fabulous bench and I love the trim on your arch. We have arches, but no trim. Wish we had added that.
Thanks so much Kim! I ordered that wooden arch online from curve makers. Wasn’t hard to install you should check them out!
This is a very clever idea! It looks so unique and fun! We’ll be featuring it over at Someday Crafts tomorrow!! 🙂
Thank you so much Miranda!!
Dria, this turned out fantastic – love it!!! Thanks so much for sharing and joining us at Best of the Weekend! Pinning and will be sharing on FB over the weekend – and I hope yours is wonderful!
Thank you so much Cindy! 🙂 Happy to be partying with you girls! Have a fantastic weekend!!
Ditto what Cindy said – so happy to have you at our party!! Great project!!!
Thank you so much Clare so happy to be there!
Thanks for sharing this! I’m interested in taking what I learned here and try to make it into a tv stand.
Thanks for stopping by Laura! That would look fantastic as a tv stand! Post back and let me know when you’ve done it I’d love to see it 🙂
That’s so cute! Thanks for sharing at weekend reads!
Thank you so much Paige!
It is gorgeous. I love how it adds that rustic and time worn look to your board and batten walls. Gorgeous. Thanks for sharing at Silver Pennies Sundays. x
🙂 Thank you so much Danielle!!
Oh my gosh! We live in an old house and my husband is getting ready to replace some of the plumbing….I’m totally going to make this! Thank you!!!! Visiting from Catch as Catch Can.
That’s awesome Stacy please post when you make your bench I’d love to see it!!!
This is a wonderful project…I am inspired! Thanks for sharing!
Thank you so much Linda!
Very cool…LOVE it 🙂
Thank you so much Laurel!!
WOW! this is amazing, Thank you so much for linking up.
Thank you so much Suburbsmam I was so happy to link up with you!
I love this bench! I’ve really been getting more into the industrial look lately and this is perfect without looking too modern. It looks great in your home also. I may need to try something like this, maybe as a side table…
Thank you so much Jen, you should definitely make one I’d love to see it in your space!!
Oh My Gosh, I just love this! It is so rustic and beautiful. Great job on the table and the tutorial.
Thank you so much Cynthia!
Dria, I’ve chosen this as my main feature tonight from last week’s Project Inspire{d} party.
Thanks for sharing it!!
Nancy
Aww Thank you so much Nancy I’m honored!!
Way cool idea!!! Love it!
Thank you so much Leslie!
Dria, I LOVE that bench! That is so creative and looks just right in that hallway. Sharon
🙂 Thanks so much Sharon!!
This is so cool! I love how it looks in your home. Such a great piece with character. 🙂
Thank you so much Sherry!!
I’ve seen your gorgeous table featured several places, I had to come over and tell you how much I love it! Pinning 🙂
🙂 Thank you so much Chelsea!!
I just had to see how you did that. I saw you featured at Diy Showoff and hopped over. Very nice! I’m inspired for a future project.
Keep creating! Cindy
Thanks so much Cindy! I can’t wait to see your future project 🙂
Ok LOVE the bench, but I am distracted by that GORGEOUS arched doorway. MMMMM! swoon. If this is the kind of arch. detail in your house I’m lookin for more – will have to look around your site. Also, that vent under the bench– Gave me the idea I have been looking for — to replace my hideous one in my staircase right — is that metal radiator cover sheeting and a frame you made????? Its all beautiful. I found you on rainonatinroof.com.
Hi Jessica thanks for stopping by! Yup I made that vent cover you can see how here 🙂 I had that arch shipped to me I bought it online I’ll have to find the company name and update the dining room post w/a link to them! Let me know if you replace your vent I’d love to see it!!
Loved, loved, loved this bench so much that you were featured at Give Me The Goods Monday! Head over to check it out and grab a button: http://www.rainonatinroof.com/2013/06/give-me-goods-monday-features-11.html
Jenna @ Rain on a Tin Roof
Aww Thank You so much Jenna! I’m so honored to be featured by you!!
It came out perfect! I love it. Can work in numerous design styles. I love infusing rustic with industrial and this would be a super piece for that style. NICE JOB and thanks for sharing!
Thanks so much John! This really was an easy and fun project to do!
I just love this Dria! 🙂 Your home is so beautiful, btw! Great detail!! Thanks so much for sharing on Project Inspire{d}…pinning! 🙂
Nancy
🙂 Thank you Nancy! I’ve been dying to do this for a while now so happy it’s finally done! You’re welcome ~ I love Project Inspire{d} party!!
I LOVE this! It has an awesome industrial look! Thanks for linking up to Give Me the Goods Monday! Love having you party with us!! Jenna @ Rain on a Tin Roof
Thank you so much Jenna! I’m so excited to be linking up with you! 🙂
That is awesome!!!!! I love the iron pipe idea! This just might make my to do’s!
Shelly- MinettesMaze.blogspot.com
😉 Thanks for stopping by and the kind words Shelly! Definitely give it a go, it was so easy to do!
Beautiful job! It came together very nicely.
Thanks so much Brandi!
Hi Dria,
That looksing AMAZING! I love the contrast of the raw industrial look against the smooth board & battan.
Well done you – that’s an aweome piece!!
Cheers, Becky
🙂 Thank you Becky!!!
I love this bench and such a great idea! 🙂
🙂 Thank you Melissa! I have been waiting a long time to make one of these I think the color is a little dark on the wood but I love it!
Look at you!! This is wonderful!! Great job!~~Angela
😉 Thank you Angela!! Been a busy few weekends w/the home improvement projects in my house! The kitchen is going to take a few more weekends to get done can’t wait to post about that!